Using llvm-mca for predicting CPU cycle impact of code changes

Way back in the distant past, when the Apple ][ and the Commodore 64 were king, you could read the manual for a microprocessor and see how many CPU cycles each instruction took, and then do the math as to how long a sequence of instructions would take to execute. This cycle counting was used pretty effectively to do really neat things such as how you’d get anything on the screen from an Atari 2600. Modern CPUs are… complex. They can do several things at once, in a different order than what you wrote them in, and have an interesting arrangement of shared resources to allocate.

So, unlike with simpler hardware, if you have a sequence of instructions for a modern processor, it’s going to be pretty hard to work out how many cycles that could take by hand, and it’s going to differ for each micro-architecture available for the instruction set.

When designing a microprocessor, simulating what a series of existing instructions will take to execute compared to the previous generation of microprocessor is pretty important. The aim should be for it to take less time or energy or some other metric that means your new processor is better than the old one. It can be okay if processor generation to generation some sequence of instructions take more cycles, if your cycles are more frequent, or power efficient, or other positive metric you’re designing for.

Programmers may want this simulation too, as some code paths get rather performance critical for certain applications. Open Source tools for this aren’t as prolific as I’d like, but there is llvm-mca which I (relatively) recently learned about.

llvm-mca is a performance analysis tool that uses information available in LLVM (e.g. scheduling models) to statically measure the performance of machine code in a specific CPU.

the llvm-mca docs

So, when looking at an issue in the IPv6 address and connection hashing code in Linux last year, and being quite conscious of modern systems dealing with a LOT of network packets, and thus this can be quite CPU usage sensitive, I wanted to make sure that my suggested changes weren’t going to have a large impact on performance – across the variety of CPU generations in use.

There’s two ways to do this: run everything, throw a lot of packets at something, and measure it. That can be a long dev cycle, and sometimes just annoying to get going. It can be a lot quicker to simulate the small section of code in question and do some analysis of it before going through the trouble of spinning up multiple test environments to prove it in the real world.

So, enter llvm-mca and the ability to try and quickly evaluate possible changes before testing them. Seeing as the code in question was nicely self contained, I could easily get this to a point where I could easily get gcc (or llvm) to spit out assembler for it separately from the kernel tree. My preference was for gcc as that’s what most distros end up compiling Linux with, including the Linux distribution that’s my day job (Amazon Linux).

In order to share the results of the experiments as part of the discussion on where the code changes should end up, I published the code and results in a github project as things got way too large to throw on a mailing list post and retain sanity.

I used a container so that I could easily run it in a repeatable isolated environment, as well as have others reproduce my results if needed. Different compiler versions and optimization levels will very much produce different sequences of instructions, and thus possibly quite different results. This delta in compiler optimization levels is partially why the numbers don’t quite match on some of the mailing list messages, although the delta of the various options was all the same. The other reason is learning how to better use llvm-mca to isolate down the exact sequence of instructions I was caring about (and not including things like the guesswork that llvm-mca has to do for branches).

One thing I learned along the way is how to better use llvm-mca to get the results that I was looking for. One trick is to very much avoid branches, as that’s going to be near complete guesswork as there’s not a simulation of the branch predictor (at least in the version I was using.

The big thing I wanted to prove: is doing the extra work having a small or large impact on number of elapsed cycles. The answer was that doing a bunch of extra “work” was essentially near free. The CPU core could execute enough things in parallel that the incremental cost of doing extra work just… wasn’t relevant.

This helped getting a patch deployed without impact to performance, as well as get a patch upstream, fixing an issue that was partially fixed 10 years prior, and had existed since day 1 of the Linux IPv6 code.

Naturally, this wasn’t a solo effort, and that’s one of the joys of working with a bunch of smart people – both at the same company I work for, and in the broader open source community. It’s always humbling when you’re looking at code outside your usual area of expertise that was written (and then modified) by Really Smart People, and you’re then trying to fix a problem in it, while trying to learn all the implications of changing that bit of code.

Anyway, check out llvm-mca for your next adventure into premature optimization, as if you’re going to get started with evil, you may as well start with what’s at the root of all of it.

Personal Finance Apps

I (relatively) recently went down the rabbit hole of trying out personal finance apps to help get a better grip on, well, the things you’d expect (personal finances and planning around them).

In the past, I’ve had an off-again-on-again relationship with GNUCash. I did give it a solid go for a few months in 2004/2005 it seems (I found my old files) and I even had the OFX exports of transactions for a limited amount of time for a limited number of bank accounts! Amazingly, there’s a GNUCash port to macOS, and it’ll happily open up this file from what is alarmingly close to 20 years ago.

Back in those times, running Linux on the desktop was even more of an adventure than it has been since then, and I always found GNUCash to be strange (possibly a theme with me and personal finance software), but generally fine. It doesn’t seem to have changed a great deal in the years since. You still have to manually import data from your bank unless you happen to be lucky enough to live in the very limited number of places where there’s some kind of automation for it.

So, going back to GNUCash was an option. But I wanted to survey the land of what was available, and if it was possible to exchange money for convenience. I am not big on the motivation to go and spend a lot of time on this kind of thing anyway, so it had to be easy for me to do so.

For my requirements, I basically had:

  • Support multiple currencies
  • Be able to import data from my banks, even if manually
  • Some kind of reporting and planning tools
  • Be easy enough to use for me, and not leave me struggling with unknown concepts
  • The ability to export data. No vendor lock-in

I viewed a mobile app (iOS) as a Nice to Have rather than essential. Given that, my shortlist was:

GNUCash

I’ve used it before, its web site at https://www.gnucash.org/ looks much the same as it always has. It’s Free and Open Source Software, and is thus well aligned with my values, and that’s a big step towards not having vendor lock-in.

I honestly could probably make it work. I wish it had the ability to import transactions from banks for anywhere I have ever lived or banked with. I also wish the UI got to be a bit more consistent and modern, and even remotely Mac like on the Mac version.

Honestly, if the deal was that a web service would pull bank transactions in exchange for ~$10/month and also fund GNUCash development… I’d struggle to say no.

Quicken

Here’s an option that has been around forever – https://www.quicken.com/ – and one that I figured I should solidly look at. It’s actually one I even spent money on…. before requesting a refund. It’s Import/Export is so broken it’s an insult to broken software everywhere.

Did you know that Quicken doesn’t import the Quicken Interchange Format (QIF), and hasn’t since 2005?

Me, incredulously, when trying out quicken

I don’t understand why you wouldn’t support as many as possible formats that banks export your transaction data as. It cannot possibly be that hard to parse these things, nor can it possibly be code that requires a lot of maintenance.

This basically meant that I couldn’t import data from my Australian Banks. Urgh. This alone ruled it out.

It really didn’t build confidence in ever getting my data out. At every turn it seemed to be really keen on locking you into Quicken rather than having a good experience all-up.

Moneywiz

This one was new to me – https://www.wiz.money/ – and had a fancy URL and everything. I spent a bunch of time trying MoneyWiz, and I concluded that it is pretty, but buggy. I had managed to create a report where it said I’d earned $0, but you click into it, and then it gives actual numbers. Not being self consistent and getting the numbers wrong, when this is literally the only function of said app (to get the numbers right), took this out of the running.

It did sync from my US and Australian banks though, so points there.

Intuit Mint

Intuit used to own Quicken until it sold it to H.I.G. Capital in 2016 (according to Wikipedia). I have no idea if that has had an impact as to the feature set / usability of Quicken, but they now have this Cloud-only product called Mint.

The big issue I had with Mint was that there didn’t seem to be any way to get your data out of it. It seemed to exemplify vendor lock-in. This seems to have changed a bit since I was originally looking, which is good (maybe I just couldn’t find it?). But with the cloud-only approach I wasn’t hugely comfortable with having everything there. It also seemed to be lacking a few features that I was begging to find useful in other places.

It is the only product that links with the Apple Card though. No idea why that is the case.

The price tag of $0 was pretty unbeatable, which does make me wonder where the money is made from to fund its development and maintenance. My guess is that it’s through commission on the various financial products advertised through it, and I dearly hope it is not through selling data on its users (I have no reason to believe it is, there’s just the popular habit of companies doing this).

Banktivity

This is what I’ve settled on. It seemed to be easy enough for me to figure out how to use, sync with an iPhone App, be a reasonable price, and be able to import and sync things from accounts that I have. Oddly enough, nothing can connect and pull things from the Apple Card – which is really weird. That isn’t a Banktivity thing though, that’s just universal (except for Intuit’s Mint).

I’ve been using it for a bit more than a year now, and am still pretty happy. I wish there was the ability to attach a PDF of a statement to the Statement that you reconcile. I wish I could better tune the auto match/classification rules, and a few other relatively minor things.

Fitness watches and my descent into madness

Periodically in life I’ve had the desire to be somewhat fit, or at least have the benefits that come with that such as not dying early and being able to navigate a mountain (or just the city of Seattle) on foot without collapsing. I have also found that holding myself accountable via data is pretty vital to me actually going and repeatedly doing something.

So, at some point I got myself a Garmin watch. The year was 2012 and it was a Garmin Forerunner 410. It had a standard black/grey LCD screen, GPS (where getting a GPS lock could be utterly infuriatingly slow), a sensor you attached to your foot, a sensor you strap to your chest for Heart Rate monitoring, and an ANT+ dongle for connecting to a PC to download your activities. There was even some open source software that someone wrote so I could actually get data off my watch on my Linux laptops. This wasn’t a smart watch – it was exclusively for wearing while exercising and tracking an activity, otherwise it was just a watch.

However, as I was ramping up to marathon distance running, one huge flaw emerged: I was not fast enough to run a marathon in the time that the battery in my Garmin lasted. IIRC it would end up dying around 3hr30min into something, which at the time was increasingly something I’d describe as “not going for too long of a run”. So, the search for a replacement began!

The year was 2017, and the Garmin fenix 5x attracted me for two big reasons: a battery life to be respected, and turn-by-turn navigation. At the time, I seldom went running with a phone, preferring a tiny SanDisk media play (RIP, they made a new version that completely sucked) and a watch. The attraction of being able to get better maps back to where I started (e.g. a hotel in some strange city where I didn’t speak the language) was very appealing. It also had (what I would now describe as) rudimentary smart-watch features. It didn’t have even remotely everything the Pebble had, but it was enough.

So, a (non-trivial) pile of money later (even with discounts), I had myself a shiny and virtually indestructible new Garmin. I didn’t even need a dongle to sync it anywhere – it could just upload via its own WiFi connection, or through Bluetooth to the Garmin Connect app to my phone. I could also (if I ever remembered to), plug in the USB cable to it and download the activities to my computer.

One problem: my skin rebelled against the Garmin fenix 5x after a while. Like, properly rebelled. If it wasn’t coming off, I wanted to rip it off. I tried all of the tricks that are posted anywhere online. Didn’t help. I even got tested for what was the most likely culprit (a Nickel allergy), and didn’t have one of them, so I (still) have no idea what I’m actually allergic to in it. It’s just that I cannot wear it constantly. Urgh. I was enjoying the daily smart watch uses too!

So, that’s one rather expensive watch that is special purpose only, and even then started to get to be a bit of an issue around longer activities. Urgh.

So the hunt began for a smart watch that I could wear constantly. This usually ends in frustration as anything I wanted was hundreds of $ and pretty much nobody listed what materials were in it apart from “stainless steel”, “may contain”, and some disclaimer about “other materials”, which wasn’t a particularly useful starting point for “it is one of these things that my skin doesn’t like”. As at least if the next one also turned out to cause me problems, I could at least have a list of things that I could then narrow down to what I needed to avoid.

So that was all annoying, with the end result being that I went a long time without really wearing a watch. Why? The search resumed periodically and ended up either with nothing, or totally nothing. That was except if I wanted to get further into some vendor lock-in.

Honestly, the only manufacturer of anything smartwatch like which actually listed everything and had some options was Apple. Bizarre. Well, since I already got on the iPhone bandwagon, this was possible. Rather annoyingly, they are very tied together and thus it makes it a bit of a vendor-lock-in if you alternate phone and watch replacement and at any point wish to switch platforms.

That being said though, it does work well and not irritate my skin. So that’s a bonus! If I get back into marathon level distance running, we’ll see how well it goes. But for more common distances that I’ve run or cycled with it… the accuracy seems decent, HR monitor never just sometimes decides I’m not exerting myself, and the GPS actually gets a lock in reasonable time. Plus it can pair with headphones and be the only thing I take out with me.

Random useful macOS things for Linux developers

A few random notes about things that can make life on macOS (the modern one, as in, circa 2023) better for those coming from Linux.

For various reasons you may end up with Mac hardware with macOS on the metal rather than Linux. This could be anything from battery life of the Apple Silicon machines (and not quite being ready to jump on the Asahi Linux bandwagon), to being able to run the corporate suite of Enterprise Software (arguably a bug more than a feature), to some other reason that is also fine.

My approach to most of my development is to have a remote more powerful Linux machine to do the heavy lifting, or do Linux development on Linux, and not bank on messing around with a bunch of software on macOS that would approximate something on Linux. This also means I can move my GUI environment (the Mac) easily forward without worrying about whatever weird workarounds I needed to do in order to get things going for whatever development work I’m doing, and vice-versa.

Terminal emulator? iTerm2. The built in Terminal.app is fine, but there’s more than a few nice things in iTerm2, including tmux integration which can end up making it feel a lot more like a regular Linux machine. I should probably go read the tmux integration best practices before I complain about some random bugs I think I’ve hit, so let’s pretend I did that and everything is perfect.

I tend to use the Mac for SSHing to bigger Linux machines for most of my work. At work, that’s mostly to a Graviton 2 EC2 Instance running Amazon Linux with all my development environments on it. At home, it’s mostly a Raptor Blackbird POWER9 system running Fedora.

Running Linux locally? For all the use cases of containers, Podman Desktop or finch. There’s a GUI part of Podman which is nice, and finch I know about because of the relatively nearby team that works on it, and its relationship to lima. Lima positions itself as WSL2-like but for Mac. There’s UTM for a full virtual machine / qemu environment, although I rarely end up using this and am more commonly using a container or just SSHing to a bigger Linux box.

There’s XCode for any macOS development that may be needed (e.g. when you want that extra feature in UTM or something) I do use Homebrew to install a few things locally.

Have a read of Andrew‘s blog post on OpenBMC Development on an Apple M1 MacBook Pro too.

Getting your photos out of Shotwell

Somewhat a while ago now, I wrote about how every time I return to write some software for the Mac, the preferred language has changed. The purpose of this adventure was to get my photos out of the aging Shotwell and onto my (then new) Mac and the Apple Photos App.

I’ve had a pretty varied experience with photo management on Linux over the past couple of decades. For a while I used f-spot as it was the new hotness. At some point this became…. slow and crashy enough that it was unusable. Today, it appears that the GitHub project warns that current bugs include “Not starting”.

At some point (and via a method I have long since forgotten), I did manage to finally get my photos over to Shotwell, which was the new hotness at the time. That data migration was so long ago now I actually forget what features I was missing from f-spot that I was grumbling about. I remember the import being annoying though. At some point in time Shotwell was no longer was the new hotness and now there is GNOME Photos. I remember looking at GNOME Photos, and seeing no method of importing photos from Shotwell, so put it aside. Hopefully that situation has improved somewhere.

At some point Shotwell was becoming rather stagnated, and I noticed more things stopping to work rather than getting added features and performance. The good news is that there has been some more development activity on Shotwell, so hopefully my issues with it end up being resolved.

One recommendation for Linux photo management was digiKam, and one that I never ended up using full time. One of the reasons behind that was that I couldn’t really see any non manual way to import photos from Shotwell into it.

With tens of thousands of photos (~58k at the time of writing), doing things manually didn’t seem like much fun at all.

As I postponed my decision, I ended up moving my main machine over to a Mac for a variety of random reasons, and one quite motivating thing was the ability to have Photos from my iPhone magically sync over to my photo library without having to plug it into my computer and copy things across.

So…. how to get photos across from Shotwell on Linux to Photos on a Mac/iPhone (and also keep a very keen eye on how to do it the other way around, because, well, vendor lock-in isn’t great).

It would be kind of neat if I could just run Shotwell on the Mac and have some kind of import button, but seeing as there wasn’t already a native Mac port, and that Shotwell is written in Vala rather than something I know has a working toolchain on macOS…. this seemed like more work than I’d really like to take on.

Luckily, I remembered that Shotwell’s database is actually just a SQLite database pointing to all the files on disk. So, if I could work out how to read it accurately, and how to import all the relevant metadata (such as what Albums a photo is in, tags, title, and description) into Apple Photos, I’d be able to make it work.

So… is there any useful documentation as to how the database is structured?

Semi annoyingly, Shotwell is written in Vala, a rather niche programming language that while integrating with all the GObject stuff that GNOME uses, is largely unheard of. Luckily, the database code in Shotwell isn’t too hard to read, so was a useful fallback for when the documentation proves inadequate.

So, I armed myself with the following resources:

Programming the Mac side of things, it was a good excuse to start looking at Swift, so knowing I’d also need to read a SQLite database directly (rather than use any higher level abstraction), I armed myself with the following resources:

From here, I could work on getting the first half going, the ability to view my Shotwell database on the Mac (which is what I posted a screenshot of back in Feb 2022).

But also, I had to work out what I was doing on the other end of things, how would I import photos? It turns out there’s an API!

A bit of SwiftUI code:

import SwiftUI
import AppKit
import Photos

struct ContentView: View {
    @State var favorite_checked : Bool = false
    @State var hidden_checked : Bool = false
    var body: some View {
        VStack() {
            Text("Select a photo for import")
            Toggle("Favorite", isOn: $favorite_checked)
            Toggle("Hidden", isOn: $hidden_checked)
            Button("Import Photo")
            {
                let panel = NSOpenPanel()
                panel.allowsMultipleSelection = false
                panel.canChooseDirectories = false
                if panel.runModal() == .OK {
                    let photo_url = panel.url!
                    print("selected: " + String(photo_url.absoluteString))
                    addAsset(url: photo_url, isFavorite: favorite_checked, isHidden: hidden_checked)
                }
            }
            .padding()
        }
    }
}

struct ContentView_Previews: PreviewProvider {
    static var previews: some View {
        ContentView()
    }
}

Combined with a bit of code to do the import (which does look a bunch like the examples in the docs):

import SwiftUI
import Photos
import AppKit

@main
struct SinglePhotoImporterApp: App {
    var body: some Scene {
        WindowGroup {
            ContentView()
        }
    }
}

func addAsset(url: URL, isFavorite: Bool, isHidden: Bool) {
    // Add the asset to the photo library.
    let path = "/Users/stewart/Pictures/1970/01/01/1415446258647.jpg"
    let url = URL(fileURLWithPath: path)
    PHPhotoLibrary.shared().performChanges({
        let addedImage = PHAssetChangeRequest.creationRequestForAssetFromImage(atFileURL: url)
        addedImage?.isHidden = isHidden
        addedImage?.isFavorite = isFavorite
    }, completionHandler: {success, error in
        if !success { print("Error creating the asset: \(String(describing: error))") } else
        {
            print("Imported!")
        }
    })
}

This all meant I could import a single photo. However, there were some limitations.

There’s the PHAssetCollectionChangeRequest to do things to Albums, so it would solve that problem, but I couldn’t for the life of me work out how to add/edit Titles and Descriptions.

It was so close!

So what did I need to do in order to import Titles and Descriptions? It turns out you can do that via AppleScript. Yes, that thing that launched in 1993 and has somehow survived the transition of m68k based Macs to PowerPC based Macs to Intel based Macs to ARM based Macs.

The Photos dictionary for AppleScript

So, just to make it easier to debug what was going on, I started adding code to my ShotwellImporter tool that would generate snippets of AppleScript I could run and check that it was doing the right thing…. but then very quickly ran into a problem…. it appears that the AppleScript language interpreter on modern macOS has limits that you’d be more familiar with in 1993 than 2023, and I very quickly hit limits where the script would just error out before running (I was out of dictionary size allegedly).

But there’s a new option! Everything you can do with AppleScript you can now do with JavaScript – it’s just even less documented than AppleScript is! But it does work! I got to the point where I could generate JavaScript that imported photos, into all the relevant albums, and set title and descriptions.

A useful write up of using JavaScript rather than AppleScript to do things with Photos: https://mudge.name/2019/11/13/scripting-photos-for-macos-with-javascript/

More recent than when I was doing my hacking, https://alexwlchan.net/2023/managing-albums-in-photos/ is a good read.

With luck I’ll find some time to write up a bit of a walkthrough of my code, and push it up somewhere.

Adventures in the Apple Partition Map (Part 2 of the continuing adventures with the Apple Power Macintosh 7200/120 PC Compatible)

I “recently” wrote about obtaining a new (to me, actually quite old) computer over in The Apple Power Macintosh 7200/120 PC Compatible (Part 1). This post is a bit of a detour, but may help others understand why some images they download from the internet don’t work.

Disk partitioning is (of course) a way to divide up a single disk into multiple volumes (partitions) for different uses. While the idea is similar, computer platforms over the ages have done this in a variety of different ways, with varying formats on disk, and varying limitations. The ones that you’re most likely to be familiar with are the MBR partitioning scheme (from the IBM PC), and the GPT partitioning scheme (common for UEFI systems such as the modern PC and Mac). One you’re less likely to be familiar with is the Apple Partition Map scheme.

The way all IBM PCs and compatibles worked from the introduction of MS-DOS 2.0 in 1983 until some time after 2005 was the Master Boot Record partitioning scheme. It was outrageously simple: of the first 512 byte sector of a disk, the first 446 bytes was for the bootstrapping code (the “boot sector”), the last 2 bytes were for the magic two bytes telling the BIOS this disk was bootable, and the other 64 bytes were four entries of 16 bytes, each describing a disk partition. The Wikipedia page is a good overview of what it all looks like. Since “four partitions should be enough for anybody” wasn’t going to last, DOS 3.2 introduced “extended partitions” which was just using one of those 4 partitions as another similar data structure that could point to more partitions.

In the 1980s (similar to today), the Macintosh was, of course, different. The Apple Partition Map is significantly more flexible than the MBR on PCs. For a start, you could have more than four partitions! You could actually have a lot more than four partitions, as the Apple Partition Map is a single 512-byte sector for each partition, and the partition map is itself a partition. Instead of being block 0 (like the MBR is), it actually starts at block 1, and is contiguous (The Driver Descriptor Record is what’s at block 0). So, once created, it’s hard to extend. Typically it’d be created as 64×512-byte entries, for 32kb… which turns out is actually about enough for anyone.

The Inside Macintosh reference on the SCSI Manager goes through more detail as to these structures. If you’re wondering what language all the coding examples are in, it’s Pascal – which was fairly popular for writing Macintosh applications in back in the day.

But the actual partition map isn’t the “interesting” part of all this (and yes, the quotation marks are significant here), because Macs are pretty darn finicky about what disks to boot off, which gets to be interesting if you’re trying to find a CD-ROM image on the internet from which to boot, and then use to install an Operating System from.

Every time I program a Mac…

… the preferred programming language changes.

I never programmed a 1980s Macintosh actually in the 1980s. It was sometime in the early 1990s that I first experienced Microsoft Basic for the Macintosh. I’d previously (unknowingly at the time as it was branded Commodore) experienced Microsoft BASIC on the Commodore 16, Commodore 64, and even the Apple ][, but the Macintosh version was something else. It let you do some pretty neat things such as construct a GUI with largely the same amount of effort as it took to construct a Text based UI on the micros I was familiar with.

Okay, to be fair, I’d also dabbled in Microsoft QBasic that came bundled with MS-DOS of the era, which let you do a whole bunch of graphics – so you could theoretically construct a GUI with it. Something I did attempt to do. Programming on the Mac was so much easier to construct a GUI.

Of course, Microsoft Basic wasn’t the preferred way to program on the Macintosh. At that time it was largely Pascal, with C being something that also existed – but you were going to see Pascal in Inside Macintosh. It was probably somewhat fortuitous that I’d poked at Pascal a bit as something alternate to look at in the high school computing classes. I can only remember using TurboPascal on DOS systems and never actually writing Pascal on the Macintosh.

By the middle part of the 1990s though, I was firmly incompetently writing C on the Mac. No doubt the quality of my code increased after I’d done some university courses actually covering the language rather than the only practical way I had to attempt to write anything useful being looking at Inside Macintosh examples in Pascal and “C for Dummies” which was very not-Macintosh. Writing C on UNIX/Linux was a lot easier – everything was made for it, including Actual Documentation!

Anyway, in the early 2000s I ran MacOS X for a bit on my white iBook G3, and did a (very) small amount of any GUI / Project Builder (the precursor to Xcode) related development – instead largely focusing on command line / X11 things. The latest coolness being to use Objective-C to program applications (unless you were bringing over your Classic MacOS Carbon based application, then you could still write C). Enter some (incompetent) Objective-C coding!

Then Apple went to x86, so the hardware ceased being interesting, and I had no reason to poke at it even as a side effect of having hardware that could run the software stack. Enter a long-ass time of Debian, Ubuntu, and Fedora on laptops.

Come 2022 though, and (for reasons I should really write up), I’m poking at a Mac again and it’s now Swift as the preferred way to write apps. So, I’m (incompetently) hacking away at Swift code. I have to admit, it’s pretty nice. I’ve managed to be somewhat productive in a relative short amount of time, and all the affordances in the language gear towards the kind of safety that is a PITA when coding in C.

So this is my WIP utility to be able to import photos from a Shotwell database into the macOS Photos app:

There’s a lot of rough edges and unknowns left, including how to actually do the import (it looks like there’s going to be Swift code doing AppleScript things as the PhotoKit API is inadequate). But hey, some incompetent hacking in not too much time has a kind-of photo browser thing going on that feels pretty snappy.

An Unearthly Child

So, this idea has been brewing for a while now… try and watch all of Doctor Who. All of it. All 38 seasons. Today(ish), we started. First up, from 1963 (first aired not quite when intended due to the Kennedy assassination): An Unearthly Child. The first episode of the first serial.

A lot of iconic things are there from the start: the music, the Police Box, embarrassing moments of not quite remembering what time one is in, and normal humans accidentally finding their way into the TARDIS.

I first saw this way back when a child, where they were repeated on ABC TV in Australia for some anniversary of Doctor Who (I forget which one). Well, I saw all but the first episode as the train home was delayed and stopped outside Caulfield for no reason for ages. Some things never change.

Of course, being a show from the early 1960s, there’s some rougher spots. We’re not about to have the picture of diversity, and there’s going to be casual racism and sexism. What will be interesting is noticing these things today, and contrasting with my memory of them at the time (at least for episodes I’ve seen before), and what I know of the attitudes of the time.

“This year-ometer is not calculating properly” is a very 2020 line though (technically from the second episode).

libeatmydata v129

Every so often, I release a new libeatmydata. This has not happened for a long time. This is just some bug fixes, most of which have been in the Debian package for some time, I’ve just been lazy and not sat down and merged them.

git clone https://github.com/stewartsmith/libeatmydata.git

Download the source tarball from here: libeatmydata-129.tar.gz and GPG signature: libeatmydata-129.tar.gz.asc from my GPG key.

Or, feel free to grab some Fedora RPMs:

Releases published also in the usual places:

The Apple Power Macintosh 7200/120 PC Compatible (Part 1)

So, I learned something recently: if you pick up your iPhone with eBay open on an auction bid screen in just the right way, you may accidentally click the bid button and end up buying an old computer. Totally not the worst thing ever, and certainly a creative way to make a decision.

So, not too long later, a box arrives!

In the 1990s, Apple created some pretty “interesting” computers and product line. One thing you could get is a DOS Compatibility (or PC Compatibility) card. This was a card that went into one of the expansion slots on a Mac and had something really curious on it: most of the guts of a PC.

Others have written on these cards too: https://www.engadget.com/2009-12-10-before-there-was-boot-camp-there-were-dos-compatibility-cards.html and http://www.edibleapple.com/2009/12/09/blast-from-the-past-a-look-back-at-apples-dos-compatibility-cards/. There’s also the Service Manual https://tim.id.au/laptops/apple/misc/pc_compatibility_card.pdf with some interesting details.

The machine I’d bought was an Apple Power Macintosh 7200/120 with the PC Compatible card added afterwards (so it doesn’t have the PC Compatible label on the front like some models ended up getting).

The Apple Power Macintosh 7200/120

Wikipedia has a good article on the line, noting that it was first released in August 1995, and fitting for the era, was sold as about 14 million other model numbers (okay not quite that bad, it was only a total of four model numbers for essentially the same machine). This specific model, the 7200/120 was introduced on April 22nd, 1996, and the original web page describing it from Apple is on the wayback machine.

For older Macs, Low End Mac is a good resource, and there’s a page on the 7200, and amazingly Apple still has the tech specs on their web site!

The 7200 series replaced the 7100, which was one of the original PowerPC based Macs. The big changes are using the industry standard PCI bus for its three expansion slots rather than NuBus. Rather surprisingly, NuBus was not Apple specific, but you could not call it widely adopted by successful manufacturers. Apple first used NuBus in the 1987 Macintosh II.

The PCI bus was standardized in 1992, and it’s almost certain that a successor to it is in the computer you’re using to read this. It really quite caught on as an industry standard.

The processor of the machine is a PowerPC 601. The PowerPC was an effort of IBM, Apple, and Motorola (the AIM Alliance) to create a class of processors for personal computers based on IBM’s POWER Architecture. The PowerPC 601 was the first of these processors, initially used by Apple in its Power Macintosh range. The machine I have has one running at a whopping 120Mhz. There continued to be PowerPC chips for a number of years, and IBM continued making POWER processors even after that. However, you are almost certainly not using a PowerPC derived processor in the computer you’re using to read this.

The PC Compatibility card has on it a full on legit Pentium 100 processor, and hardware for doing VGA graphics, a Sound Blaster 16 and the other things you’d usually expect of a PC from 1996. Since it’s on a PCI card though, it’s a bit different than a PC of the era. It doesn’t have any expansion slots of its own, and in fact uses up one of the three PCI slots in the Mac. It also doesn’t have its own floppy drive, or hard drive. There’s software on the Mac that will let the PC card use the Mac’s floppy drive, and part of the Mac’s hard drive for the PC!

The Pentium 100 was the first mass produced superscalar processor. You are quite likely to be using a computer with a processor related to the Pentium to read this, unless you’re using a phone or tablet, or one of the very latest Macs; in which case you’re using an ARM based processor. You likely have more ARM processors in your life than you have socks.

Basically, this computer is a bit of a hodge-podge of historical technology, some of which ended up being successful, and other things less so.

Let’s have a look inside!

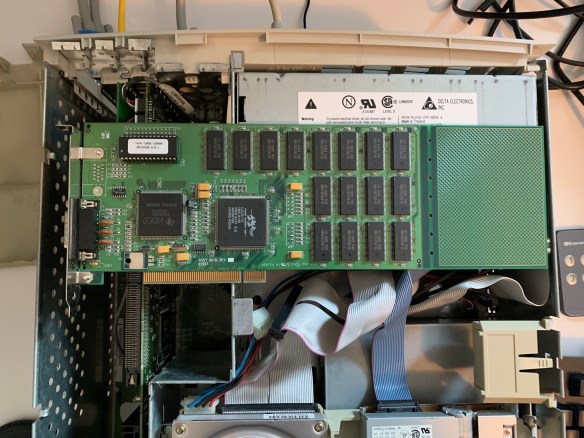
So, one of the PCI slots has a Vertex Twin Turbo 128M8A video card in it. There is not much about this card on the internet. There’s a photo of one on Wikimedia Commons though. I’ll have to investigate more.

Does it work though? Yes! Here it is on my desk:

The powered on Power Mac 7200/120

Even with Microsoft Internet Explorer 4.0 that came with MacOS 8.6, you can find some places on the internet you can fetch files from, at a not too bad speed even!

More fun times with this machine to come!

Photos from Taiwan

A few years ago we went to Taiwan. I managed to capture some random bits of the city on film (and also some shots on my then phone, a Google Pixel). I find the different style of art on the streets around the world to be fascinating, and Taiwan had some good examples.

I’ve really enjoyed shooting Kodak E100VS film over the years, and some of my last rolls were shot in Taiwan. It’s a film that unfortunately is not made anymore, but at least we have a new Ektachrome to have fun with now.

Words for our time: “Where there is democracy, equality and freedom can exist; without democracy, equality and freedom are merely empty words”.

This is, of course, only a small number of the total photos I took there. I’d really recommend a trip to Taiwan, and I look forward to going back there some day.

Two Photos from Healseville Sanctuary

If you’re near Melbourne, you should go to Healseville Sanctuary and enjoy the Australian native animals. I’ve been a number of times over the years, and here’s a couple of photos from a (relatively, as in, the last couple of years) trip.

Leah trying to photograph a much too close bird
Koalas seem to always look like they’ve just woken up. I’m pretty convinced this one just had.

Photos from Tasmania (2017)

On the random old photos train, there’s some from spending time in Tasmania post linux.conf.au 2017 in Hobart.

All of these are Kodak E100VS film, which was no doubt a bit out of date by the time I shot it (and when they stopped making Ektachrome for a while). It was a nice surprise to be reminded of a truly wonderful Tassie trip, taken with friends, and after the excellent linux.conf.au.

Photos from long ago….

It’s strange to get unexpected photos from a while ago. It’s also joyous.

These photos above are from a park down the street from where we used to live. I believe it was originally a quarry, and a number of years ago the community got together and turned it into a park. It’s a quite decent size (Parkrun is held there), and there’s plenty of birds (and ducks!) to see.

Moorabbin Station

It’s a very strange feeling seeing photos from both the before time, and from where I used to live. I’m sure that if the world wasn’t the way it was now, and there wasn’t a pandemic, it would feel different.

All of the above were shot on a Nikon F80 with 35mm Fuji Velvia 50 film.

op-build v2.5 firmware for the Raptor Blackbird

Well, following on from my post where I excitedly pointed out that Raptor Blackbird support: all upstream in op-build v2.5, that means I can do another in my series of (close to) upstream Blackbird firmware builds.

This time, the only difference from straight upstream op-build v2.5 is my fixes for buildroot so that I can actually build it on Fedora 32.

So, head over to https://www.flamingspork.com/blackbird/op-build-v2.5-blackbird-images/ and grab blackbird.pnor to flash it on your blackbird, let me know how it goes!

Refurbishing my Macintosh Plus

Somewhere in the mid to late 1990s I picked myself up a Macintosh Plus for the sum of $60AUD. At that time there were still computer Swap Meets where old and interesting equipment was around, so I headed over to one at some point (at the St Kilda Town Hall if memory serves) and picked myself up four 1MB SIMMs to boost the RAM of it from the standard 1MB to the insane amount of 4MB. Why? Umm… because I could? The RAM was pretty cheap, and somewhere in the house to this day, I sometimes stumble over the 256KB SIMMs as I just can’t bring myself to get rid of them.

This upgrade probably would have cost close to $2,000 at the system’s release. If the Macintosh system software were better at disk caching you could have easily held the whole 800k of the floppy disk in memory and still run useful software!

One of the annoying things that started with the Macintosh was odd screws and Apple gear being hard to get into. Compare to say, the Apple ][ which had handy clips to jump inside whenever. In fitting my massive FOUR MEGABYTES of RAM back in the day, I recall using a couple of allen keys sticky-taped together to be able to reach in and get the recessed Torx screws. These days, I can just order a torx bit off Amazon and have it arrive pretty quickly. Well, two torx bits, one of which is just too short for the job.

My (dusty) Macintosh Plus

One thing had always struck me about it, it never really looked like the photos of the Macintosh Plus I saw in books. In what is an embarrassing number of years later, I learned that a lot can be gotten from the serial number printed on the underside of the front of the case.

So heading over to the My Old Mac Serial Number Decoder I can find out:

Manufactured in: F => Fremont, California, USA
Year of production: 1985
Week of production: 14
Production number: 3V3 => 4457
Model ID: M0001WP => Macintosh 512K (European Macintosh ED)

Your Macintosh 512K (European Macintosh ED) was the 4457th Mac manufactured during the 14th week of 1985 in Fremont, California, USA.

Pretty cool! So it is certainly a Plus as the logic board says that, but it’s actually an upgraded 512k! If you think it was madness to have a GUI with only 128k of RAM in the original Macintosh, you’d be right. I do not envy anybody who had one of those.

Some time a decent (but not too many, less than 10) years ago, I turn on the Mac Plus to see if it still worked. It did! But then… some magic smoke started to come out (which isn’t so good), but the computer kept working! There’s something utterly bizarre about looking at a computer with smoke coming out of it that continues to function perfectly fine.

Anyway, as the smoke was coming out, I decided that it would be an opportune time to turn it off, open doors and windows, and put it away until I was ready to deal with it.

One Global Pandemic Later, and now was the time.

I suspected it was going to be a capacitor somewhere that blew, and figured that I should replace it, and probably preemptively replace all the other electrolytic capacitors that could likely leak and cause problems.

First thing’s first though: dismantle it and clean everything. First, taking the case off. Apple is not new to the game of annoying screws to get into things. I ended up spending $12 on this set on Amazon, as the T10 bit can actually reach the screws holding the case on.

Cathode Ray Tubes are not to be messed with. We’re talking lethal voltages here. It had been many years since electricity went into this thing, so all was good. If this all doesn’t work first time when reassembling it, I’m not exactly looking forward to discharging a CRT and working on it.

The inside of my Macintosh Plus, with lots of grime.

You can see there’s grime everywhere. It’s not the worst in the world, but it’s not great (and kinda sticky). Obviously, this needs to be cleaned! The best way to do that is take a lot of photos, dismantle everything, and clean it a bit at a time.

There’s four main electronic components inside a Macintosh Plus:

  1. The CRT itself
  2. The floppy disk drive
  3. The Logic Board (what Mac people call what PC people call the motherboard)
  4. The Analog Board

There’s also some metal structure that keeps some things in place. There’s only a few connectors between things, which are pretty easy to remove. If you don’t know how to discharge a CRT and what the dangers of them are you should immediately go and find out through reading rather than finding out by dying. I would much prefer it if you dyed (because creative fun) rather than died.

Once the floppy connector and the power connector is unplugged, the logic board slides out pretty easily. You can see from the photo below that I have the 4MB of RAM installed and the resistor you need to snip is, well, snipped (but look really closely for that). Also, grime.

Macintosh Plus Logic Board

Cleaning things? Well, there’s two ways that I have used (and considering I haven’t yet written the post with “hurray, it all works”, currently take it with a grain of salt until I write that post). One: contact cleaner. Two: detergent.

Macintosh Plus Logic Board (being washed in my sink)

I took the route of cleaning things first, and then doing recapping adventures. So it was some contact cleaner on the boards, and then some soaking with detergent. This actually all worked pretty well.

Logic Board Capacitors:

  • C5, C6, C7, C12, C13 = 33uF 16V 85C (measured at 39uF, 38uF, 38uF, 39uF)
  • C14 = 1uF 50V (measured at 1.2uF and then it fluctuated down to around 1.15uF)

Analog Board Capacitors

  • C1 = 35V 3.9uF (M) measured at 4.37uF
  • C2 = 16V 4700uF SM measured at 4446uF
  • C3 = 16V 220uF +105C measured at 234uF
  • C5 = 10V 47uF 85C measured at 45.6uF
  • C6 = 50V 22uF 85C measured at 23.3uF
  • C10 = 16V 33uF 85C measured at 37uF
  • C11 = 160V 10uF 85C measured at 11.4uF
  • C12 = 50V 22uF 85C measured at 23.2uF
  • C18 = 16V 33uF 85C measured at 36.7uF
  • C24 = 16V 2200uF 105C measured at 2469uF
  • C27 = 16V 2200uF 105C measured at 2171uF (although started at 2190 and then went down slowly)
  • C28 = 16V 1000uF 105C measured at 638uF, then 1037uF, then 1000uF, then 987uF
  • C30 = 16V 2200uF 105C measured at 2203uF
  • C31 = 16V 220uF 105C measured at 236uF
  • C32 = 16V 2200uF 105C measured at 2227uF
  • C34 = 200V 100uF 85C measured at 101.8uF
  • C35 = 200V 100uF 85C measured at 103.3uF
  • C37 = 250V 0.47uF measured at <exploded>. wheee!
  • C38 = 200V 100uF 85C measured at 103.3uF
  • C39 = 200V 100uF 85C mesaured at 99.6uF (with scorch marks from next door)
  • C42 = 10V 470uF 85C measured at 556uF
  • C45 = 10V 470uF 85C measured at 227uF, then 637uF then 600uF

I’ve ordered an analog board kit from https://console5.com/store/macintosh-128k-512k-plus-analog-pcb-cap-kit-630-0102-661-0462.html and when trying to put them in, I learned that the US Analog board is different to the International Analog board!!! Gah. Dammit.

Note that C30, C32, C38, C39, and C37 were missing from the kit I received (probably due to differences in the US and International boards). I did have an X2 cap (for C37) but it was 0.1uF not 0.47uF. I also had two extra 1000uF 16V caps.

Macintosh Repair and Upgrade Secrets (up to the Mac SE no less!) holds an Appendix with the parts listing for both the US and International Analog boards, and this led me to conclude that they are in fact different boards rather than just a few wires that are different. I am not sure what the “For 120V operation, W12 must be in place” and “for 240V operation, W12 must be removed” writing is about on the International Analog board, but I’m not quite up to messing with that at the moment.

So, I ordered the parts (linked above) and waited (again) to be able to finish re-capping the board.

I found https://youtu.be/H9dxJ7uNXOA video to be a good one for learning a bunch about the insides of compact Macs, I recommend it and several others on his YouTube channel. One interesting thing I learned is that the X2 cap (C37 on the International one) is before the power switch, so could blow just by having the system plugged in and not turned on! Okay, so I’m kind of assuming that it also applies to the International board, and mine exploded while it was plugged in and switched on, so YMMV.

Additionally, there’s an interesting list of commonly failing parts. Unfortunately, this is also for the US logic board, so the tables in Macintosh Repair and Upgrade Secrets are useful. I’m hoping that I don’t have to replace anything more there, but we’ll see.

But, after the Nth round of parts being delivered….

Note the lack of an exploded capacitor

Yep, that’s where the exploded cap was before. Cleanup up all pretty nicely actually. Annoyingly, I had to run it all through a step-up transformer as the board is all set for Australian 240V rather than US 120V. This isn’t going to be an everyday computer though, so it’s fine.

Macintosh Plus booting up (note how long the memory check of 4MB of RAM takes. I’m being very careful as the cover is off. High, and possibly lethal voltages exposed.

Woohoo! It works. While I haven’t found my supply of floppy disks that (at least used to) work, the floppy mechanism also seems to work okay.

Macintosh Plus with a seemingly working floppy drive mechanism. I haven’t found a boot floppy yet though.

Next up: waiting for my Floppy Emu to arrive as it’ll certainly let it boot. Also, it’s now time to rip the house apart to find a floppy disk that certainly should have made its way across the ocean with the move…. Oh, and also to clean up the mouse and keyboard.

Raptor Blackbird support: all upstream in op-build

Thanks to my most recent PR being merged, op-build v2.5 will have full support for the Raptor Blackbird! This includes support for the “IPL Monitor” that’s required to get fan control going.

Note that if you’re running Fedora 32 then you need some patches to buildroot to have it build, but if you’re building on something a little older, then upstream should build and work straight out of the box (err… git tree).

I also note that the work to get Secure Boot for an OS Kernel going is starting to make its way out for code reviews, so that’s something to look forward to (although without a TPM we’re going to need extra code).

A op-build v2.5-rc1 based Raptor Blackbird Build

I have done a few builds of firmware for the Raptor Blackbird since I got mine, each of them based on upstream op-build plus a few patches. The previous one was Yet another near-upstream Raptor Blackbird firmware build that I built a couple of months ago. This new build is based off the release candidate of op-build v2.5. Here’s what’s changed:

PackageOld VersionNew Version
hcodehw030220a.opmsthw050520a.opmst
hostbootacdff8a390a2654dd52fed67bdebe2b5
kexec-lite18ec88310c4134e6b0130b3c1ea489e
libflashv6.5-228-g82aed17av6.6
linuxv5.4.22v5.4.33
linux-headersv5.4.22v5.4.33
machine-xml17e9e84d504582c88e782e30829e0d6be
occ3ab29212518e65740ab4dc96fd6cf584c42
openpower-pnor6fb8d914134d544a84175f00d9c6dc395faf3
sbec318ab00116d92f08c78fb7838495ad0aab7
skibootv6.5-228-g82aed17av6.6
Changes in my latest Blackbird build

Go grab blackbird.pnor from https://www.flamingspork.com/blackbird/stewart-blackbird-6-images/, and give it a go! Just scp it to your BMC, and flash it:

pflash -E -p /tmp/blackbird.pnor

There’s two differences from upstream op-build: my pull request to op-build, and the fixing of the (old) buildroot so that it’ll build on Fedora 32. From discussions on the openpower-firmware mailing list, it seems that one hopeful thing is to have all the Blackbird support merged in before the final op-build v2.5 is tagged. The previous op-build release (v2.4) was tagged in July 2019, so we’re about 10 months into what was a 2 month release cycle, so speculating on when that final release will be is somewhat difficult.